
Digital Imaging: A Quick Guide
![]() There are several applications that can be used to retouch photos, the most well known of course is Adobe's Photoshop, but Paintshop Pro form Jasc is an excellent substitute as is Picture Publisher from Micrografx. The images on this site were all prepared with the latter, which has similar functionality to Photoshop, but comes at a fraction of the cost. Incidentally, you do not need a super-computer to run these types of software, my system only has 64K of memory and runs on a 700 Mhz Intel chip.
There are several applications that can be used to retouch photos, the most well known of course is Adobe's Photoshop, but Paintshop Pro form Jasc is an excellent substitute as is Picture Publisher from Micrografx. The images on this site were all prepared with the latter, which has similar functionality to Photoshop, but comes at a fraction of the cost. Incidentally, you do not need a super-computer to run these types of software, my system only has 64K of memory and runs on a 700 Mhz Intel chip.
STEP 1:

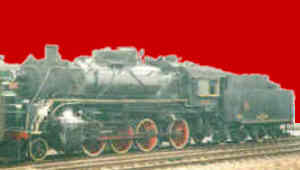
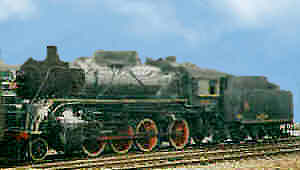
Take a hard look at the original image. Make sure that the original has as much detail as possible. One clue is given in the resolution of the original. Professional web graphics are usually set at about 72 ppi or 96 ppi, but many private sites have images a lot higher; this example had a resolution of 150 ppi, far too much for the Web, but ideal for our purpose. In addition you should also have on hand color swatches from a similar locomotive to serve as a guideline.
STEP 2:

Crop the image as needed. There is no hard and fast rules on this; with this image all unnecessary details were cropped out.
STEP 3:
Begin by masking out the sky, save the mask. Take care with the areas where the sky and the locomotive meet. You may need to zoom-in to make sure the masking tool does not accidentally include any part of the locomotive.
STEP 4:

Use the mask as a template for your sky. You do this by transferring the saved mask to the image from which you will lift the sky. Make a sky object using the mask. Try to find a sky that matches the tone of the original image. If you are in a hurry, Windows users can make use of the "Clouds.bmp" which comes packaged with the OS.
STEP 5:
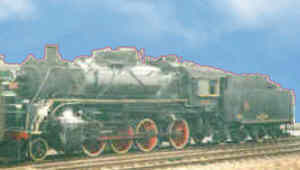
Transfer the sky object to the image. If your original mask was done properly, the two images should combine properly. At this point, make sure that the sky is retained on a separate layer.
STEP 6:
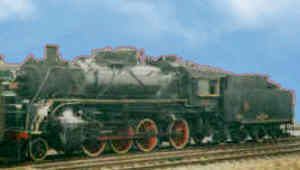
Select the underlying locomotive image and begin the process of digitally cleaning up the image. There are a variety of tools to use. The process used here was to increase the contrast, adjust the hues and the color balance, then gradually removing blemishes and sharpening the image to create better overall definition.
STEP 7:

The next step is to blend the sky with the locomotive. A variety of techniques are need here, but you will mostly need to use the blending and retouching tools. Zoom in often and use a light touch. Finish by readjusting the tonal values so that the locomotive and the sky are close in value. You especially do not want the sky to overwhelm the locomotive, the principle here is the same as with a backdrop for your layout - be subtle. The red on the chassis was also adjusted to give the wheels better definition, these are especially important features for China Railways steam locomotives.
STEP 8:
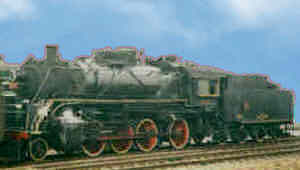
Mask off the areas of the locomotive that need further adjustment or enhancement. Once masked off, each area that needs specially attention can be safely adjust without upsetting the other areas that are already done. The picture above shows the front end after it has been darken and redefined. This process can be tedious, but the results are worthwhile. Be careful not to over compensate. To finish off, smooth out any blemishes and make certain that everything is care fully blended in.
STEP 9:
You can click on the button above to see the final version of the digitally enhanced image. This should open in a separate window, but if not please hit the back button of the browser to return. Do be advised that the image may take a while to load; unlike the other images on this site, it has not been optimized for the web so that you will be able to see the image in its uncompressed (sharpest) form. If you want to learn more about graphics on the web, please click here.
If you have any questions, please feel free to contact me
© Sean Lim 2001